The Bowes Museum Blog
Conservation of a ‘Poiret’-style Dress
2 Apr 2015
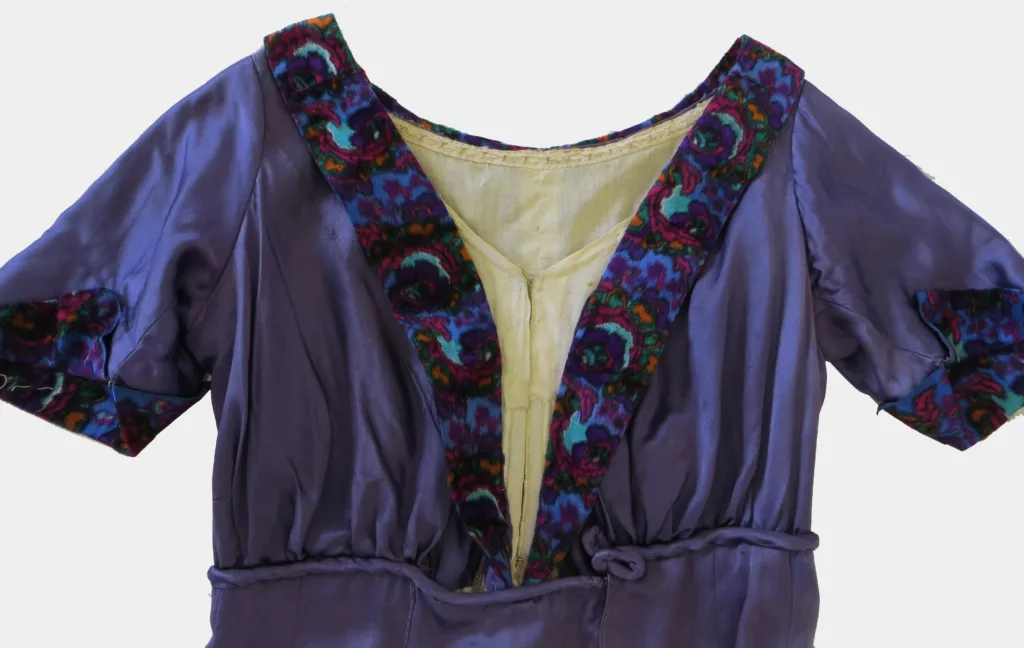
For my latest blog post, I’m going to show you the advances to one of the objects previewed in an earlier blog post. The object in question is this early 20th century dress, in the style of Paul Poiret (CST.527). It is made from purple silk satin, with a colourful printed fabric decoration around the collar and cuffs. It has been selected for the re-display of Fashion & Textile Gallery in 2019.

CST.527 Front and back images, before conservation treatment
The dress was determined to be in a fair condition. It was creased from storage, and showed stains on the purple silk and inner bodice. The main problem was a large tear near the hem, as well as some small holes, and loose seams on the front panel of the skirt.

Details of condition; clockwise from left – creasing, loose seam, soiling, large tear at the hem
The conservation treatment is now complete, it involved surface cleaning of the dress, and localised spot cleaning to try to reduce the stains around the hem. The area was tested with a dry chemical sponge first (see image below), followed by a wet method. A solution of de-ionised water and a conservation detergent (Dehypon LS45, a low-foaming non-ionic surfactant) was introduced to the area, using a piece of blotting paper to absorb the dirt and moisture. The stains were reduced considerably, leaving a slight shadow where the soiling was ingrained, but this would be hidden inside the hem.

Detail of stain removal; clockwise from left – before cleaning, after cleaning, the spot cleaning process
To reduce the creases of the silk dress, it was gently steamed allowing the creases to drop out. The final result of the treatment is satisfactory, removing all the creases.

Steaming the dress to remove the creases
The open seams were stitched closed; using a fine, curved needle and 100% polyester threads (Gutermann Mara 220 and Skala 360) in a matching colour.

Re-stitching the open seams
For the large tear and the small holes, a patched support treatment was needed. Colour-matched silk patches were used, with conservation stitching (laid-couching) using also a curved needle and polyester thread (Skala 360) in a matching colour. The silk fabric was dyed in the conservation studio to ensure a perfect match.

Detail of conservation stitching, using a colour-matched silk patch, and colour-matched thread. Below – after conservation.
The dying process probably needs a post for itself, but for the moment I’ll just tell you that in conservation we only use dyes which are colour- and wet-fast, giving us the security that they won’t fade and change colour, or harm the object if it got wet in the future. The dying process is strictly controlled, the calculations to measure proportion of dyes and additives are recorded, along with the depth of shade, dry fabric weight, time and temperature. This guarantees repeatability, producing a recipe which can be used again to create exactly the same shade (if the object requires future conservation treatment). For the dress I needed silk fabric, matching with the original, so I chose to use a medium-weight silk Habutai, with Lanaset® dyes (a 1:2 metal complex acid and reactive dye). Small samples are dyed, with the recipe then adjusted until a colour-match is created. A total of 12 samples were produced before I worked out the perfect colour.

Dying silk for patched support
For the reconstruction of the hem some contact humidification with small weights was required. The hem was then turned back into place, and invisibly stitched using polyester thread (Mara 220) to complete the treatment.
Mounting of the dress onto a custom-made acrylic mannequin will be the last step in making it ready for the future re-display, but for the moment you can appreciate the final result on a provisional mount (below).

After conservation
By Maria Pardos, Textiles Conservation Intern
![]()
![]()
Related posts
All posts
Creating a Space to Explore Collections Care
Over the last two years there has been a spurt of object movement at Museum, spurred on by the implementation of its new Mission and Values and focusing on making the collections more accessible. Some objects in storage are being relocated and some storerooms are being re-purposed. The result is that many objects which haven’t
A unique dress
In The Bowes Museum dress collection there is an evening gown designed by Paquin in 1911. Inside the bodice is a sturdy twill waist stay woven with Paquin’s signature in pink and ‘Hiver 1911’, indicating it was from her winter collection. Madame Paquin (1869–1936), was a French fashion designer, known for her modern and innovative designs. In


SIGN UP TO OUR NEWSLETTER